Monday, April 30
Michigan International Women's Show - Get your ticket now!
Wow your friends with a watercolor shirt that is SO easy, you'll be making them for everyone! Join me at the Michigan International Women's Show and get in on the workshops. You can purchase tickets online, and get to make a tie-dyed apron, and tons of other workshops. Oh, and did I mention all the booths for SHOPPING??http://www.ilovetocreate.com/workshops
Visit us on Facebook!
Craft on!
Friday, April 27
Mother's Day Creative Ideas - Cool2Craft TV
It's super cool! Cool2Craft TV April 30, 2012: Creative Challenge! The Cool2Craft team is celebrating Moms this week! EcoHeidi Borchers is creating an Embossed Craft Foam Flower featuring Aleene's FunCraft Foam Glue, Candace Jedrowicz is sharing a Hex Photo Box, Tiffany Windsor and Savannah Starr are crafting with Aleene's Collage Pauge and Linda Peterson is crafting a Mother's Day Wire Basket.
It’s easy to watch the Cool2Craft TV Channel right from your computer. Airing Monday April 30, 2012 9am Pacific/10am Mountain/11 am Central/ Noon Eastern. Go to http://cool2craft.com and you'll see the Livestream player and chat box. See you Monday!
Visit us on Facebook!Craft on!Craft on!
Thursday, April 26
From Fanny Pack to Glammy Pack
 For those of you that have been following with my journey to lose the baby weight you know that I have recently taken up jogging. I am about half way through a couch to 5k program. This is my second go at it after a stress fracture that put me on crutches and the couch for a few weeks. This time around I thought I needed a little something extra on my jogs. Something sparkly, bright and perky. This is when the idea to turn my fanny pack from the 80's into a glammy pack for 2012 hit me.
Sadly, I'm not so sure my makeover was a good one. Not every craft adventure can have a happy ending. My knee is starting to bother me again and my glammy pack came out a bit of a hot mess. Never fear, I have a few other sporty makeovers to share with you that will inspire you to ride, run and walk!
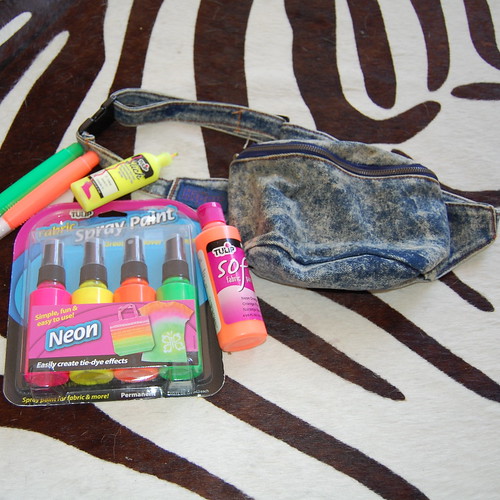 First up let's talk about my fanny pack. It started life acid washed. I'm sure at the time I had picked that option and thought it was swell. 25 years-ish later I thought I could pep the look up with a few neon accents. If nothing else it would help make me more noticeable to cars.
 Using Tulip fabric spray paint in three neon shades I coated my Hippy. I should have stopped here but I had visions of neon racing stripes and glittery wording that said something witty like "Let's Get Physical". Instead using a very unsteady hand I tried to do some stenciling that ended up looking like blobs. Truly compared to what I jog in the glammy pack looks amazing. All your craft projects can't turn out perfect right?
So if my glammy pack does not make you want to lace up and hit the trails, maybe these projects will.
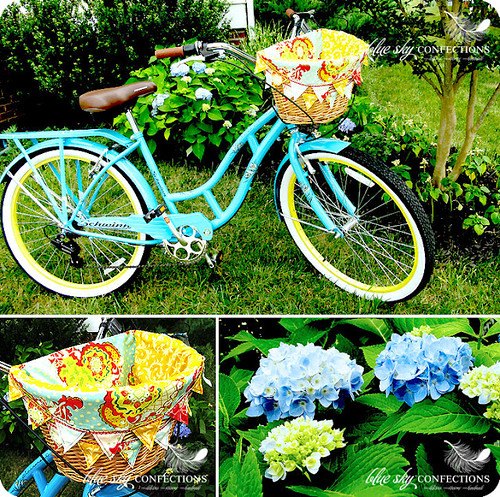 Recently one evening I rode my bike down to the local Red Box. As I peddled home the disk bobbed around in my basket almost falling out several times. I thought to myself: you need a basket liner. Blue Sky Confections you have the cutest one I have seen yet! You how I love a good pennant banner.
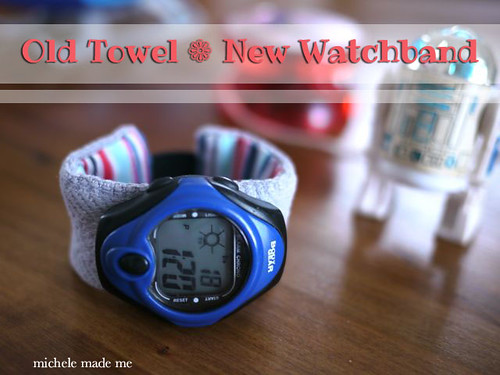 I love Michele's Old Towel New Series. I profiled her clever washcloths on BlogHer. however, this sporty wristband also caught me eye.
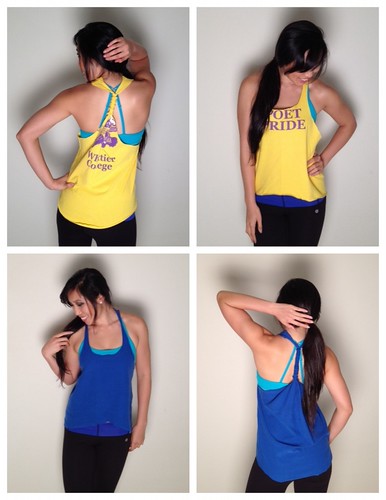 Blogilates has an adorable razor back tank top tutorial.
 I made this swim suit cover up for my daughter, but you could easily make an adult sized version. Even hardcore lap swimmers need something to wear to and from the pool.
 I get that bike riding safety is important, it is just unfortunate that helmets are typically so ugly. Jenn from Clever Girl revamped hers to make it look like R2D2.
***This is a sponsored post by I Love to Create - I was compensated & given free supplies. Mama has gotta pay the bills somehow and really who in their right mind would say no to free craft supplies***
Visit us on Facebook!
I get that bike riding safety is important, it is just unfortunate that helmets are typically so ugly. Jenn from Clever Girl revamped hers to make it look like R2D2.
***This is a sponsored post by I Love to Create - I was compensated & given free supplies. Mama has gotta pay the bills somehow and really who in their right mind would say no to free craft supplies***
Visit us on Facebook!Craft on!
Wednesday, April 25
Visit us on Facebook!
Craft on!
iLoveToCreate Teen Crafts: iLoveMom Glass Vial Necklace
Margot Potter for Avalon Potter
“Mom crafted, teen approved.”
I’ve used these glass vials in a variety of jewelry making projects over the years. They’re like miniature works of art. You can put all sorts of things inside of these, beads, glitter, printed messages...whatever makes you smile. This is the perfect way to tell Mom how much you love her with a one-of-a-kind, handcrafted wearable work of art! It’s so easy to make these with Tulip Fashion Glitter and Aleene’s glue; you’ll find yourself looking for reasons to make more! I made some matching earrings using some smaller glass vials using the same techniques for a fun, fast and fabulous jewelry set just for mom.
Materials
Miniature glass jar with cork top
Thin ribbon for accent
One large puffy and four small flat felt hearts in pink and white
Tulip Fashion Glitter in multi medium crystal
Screw eye
Ball chain necklace
2 ear wires
2 jump rings
Aleene’s Quick Dry Tacky Glue
Aleene’s Stop Fraying
Aleene's Collage Pauge Matte
Tools
2 small paintbrushes
Chain nose pliers
Scissors
Computer and printer
Pour a small amount of glitter into vial. Add felt hearts, use end of paintbrush to position them in vial. Add a small amount of glue around edge of cork stopper, insert into vial top. Use paintbrush to remove any excess glue.
Add a small amount of glue to screw eye, use chain nose pliers to screw into center top of cork stopper. Allow all glue to dry.
Take a small ribbon and tie in a bow around rim of jar. Use Aleene’s Stop Fraying on ends of ribbon. Allow to dry.
Use a typewriter font to print xoxo, x and o in 10pt. Cut out using scissors and decoupage to front of jars with Collage Pauge and a small paintbrush. Thread screw eye with ball chain necklace. Use smaller jars with glitter and ribbon to make matching earrings. Attach a jump ring and ear wire to top of stopper, repeat for second earring.
(Blogger was compensated for this post.)
Tuesday, April 24
Paper Flower Power! *Make and Wear Them 4 Ways*
I've been playing with paper
a lot lately over at my day job, so was inspired to dig into my own
paper stash for this month's iLoveToCreate project. With plenty of time
until Mother's Day, here's a delicate flower that can be applied four
different ways to create a non-wilting "bouquet" for her hand, her head,
her hair, or her lapel!

Materials:
-Paper scrap for template (brown paper bag or a sheet from the printer paper recycling) at least 3" x 3"
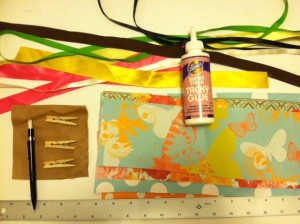 -Decorative paper scraps (card stock, book pages, paper bags, thick wrapping paper, etc., in variety of colors)
-All-purpose scissors
-Aleene's Tacky Glue and clothespins OR Aleene's Tacky Dot Rolls
-Pencil
-Ruler
-Ribbon of varying colors, widths, and lengths
Make It:
1. Fold the paper scrap in half three times to create a folded "wedge." Cut a curved edge about 1 1/4" from the point.

2. Unfold the template (it'll look a little like a four-leaf clover), lay it flat and trace it three times on one or more of the decorative paper scraps. Three tracings makes one flower.

3. Cut around the tracings to make three identical blossoms. Snip two straight lines into the center of the first blossom, cutting out a wedge equal to two "petals." Cut three petals from the second blossom, and four petals from the third blossom. Mark and then cut a 1/4" semicircle from the center of each blossom, as shown.

4. Curve each of the blossoms to the cut edges overlap a bit. Adhere with glue or dots, let dry if necessary, then fold back the tips of the petals.

5. To make a flower ring, nest the blossoms inside one another. Select a piece of ribbon, wrap it around your finger, and knot the ends so the loop fits your finger. Gently thread the loop through the center of the flower, so the knot catches and rests in the center of the flower. Trim the ends of the ribbon as desired.

6. Slip the loop over your finger and the ring is complete!

7. Return to your paper stash and repeat the process to make more! You can personalize your bloom using crayons and card stock (a sweet way for younger kids to get involved if it's a Mother's Day gift), go for a more muted geometric design using pages from an Japanese puzzle magazine, gather up some vintage appeal by cutting into that newspaper-printed paper gift bag, or simply dig into the scrapbooking scraps for some playful color.
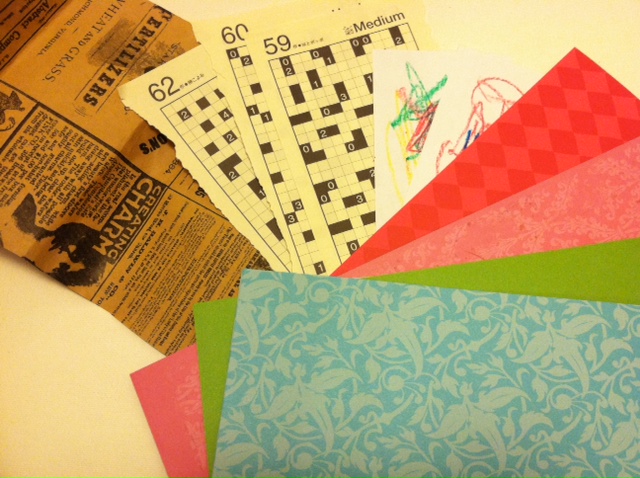
8. Keep your flowers uniform in shade...
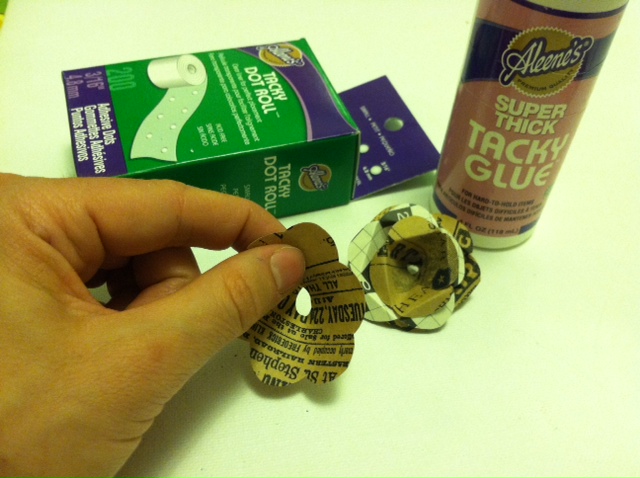
or mix and match the colored blossoms in a paper botany experiment!

9. To make the headband, brooch, or barrette, thread one end of the ribbon through the flower, back to front, knot it, and then thread the end back through the flower, front to back. Thread multiples together this way, too! Wrap the ends of the ribbon around the headband, brooch, or barrette base and glue or knot to secure it.
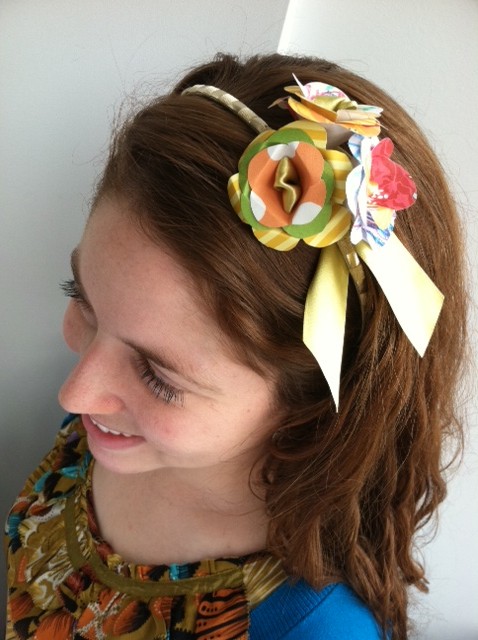
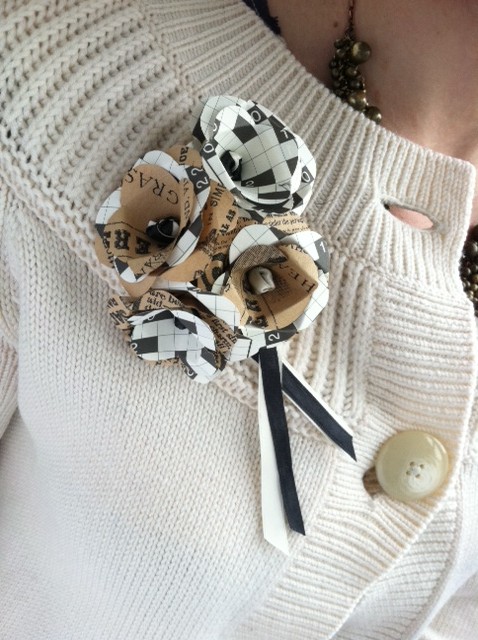
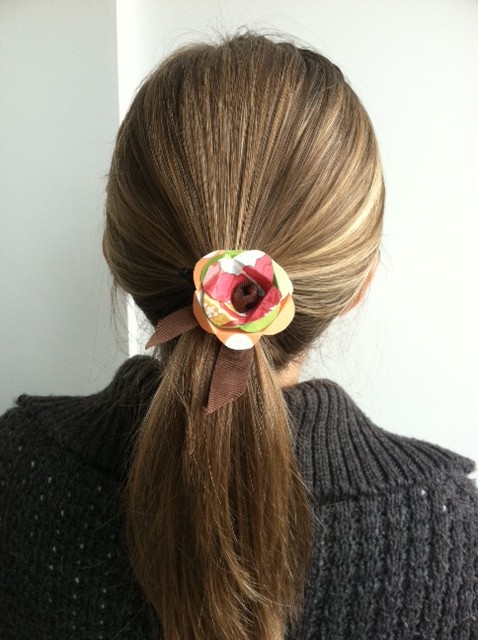
And now, the million-dollar question for the author of Generation T: Can you make these flowers with T-shirts? Absolutely! Substitute fabric glue for the adhesive, and trim the neckline of a shirt with these sweet little blooms.

Visit us on Facebook!
Craft on!

Materials:
-Paper scrap for template (brown paper bag or a sheet from the printer paper recycling) at least 3" x 3"
 -Decorative paper scraps (card stock, book pages, paper bags, thick wrapping paper, etc., in variety of colors)
-All-purpose scissors
-Aleene's Tacky Glue and clothespins OR Aleene's Tacky Dot Rolls
-Pencil
-Ruler
-Ribbon of varying colors, widths, and lengths
Make It:
1. Fold the paper scrap in half three times to create a folded "wedge." Cut a curved edge about 1 1/4" from the point.

2. Unfold the template (it'll look a little like a four-leaf clover), lay it flat and trace it three times on one or more of the decorative paper scraps. Three tracings makes one flower.

3. Cut around the tracings to make three identical blossoms. Snip two straight lines into the center of the first blossom, cutting out a wedge equal to two "petals." Cut three petals from the second blossom, and four petals from the third blossom. Mark and then cut a 1/4" semicircle from the center of each blossom, as shown.

4. Curve each of the blossoms to the cut edges overlap a bit. Adhere with glue or dots, let dry if necessary, then fold back the tips of the petals.

5. To make a flower ring, nest the blossoms inside one another. Select a piece of ribbon, wrap it around your finger, and knot the ends so the loop fits your finger. Gently thread the loop through the center of the flower, so the knot catches and rests in the center of the flower. Trim the ends of the ribbon as desired.

6. Slip the loop over your finger and the ring is complete!

7. Return to your paper stash and repeat the process to make more! You can personalize your bloom using crayons and card stock (a sweet way for younger kids to get involved if it's a Mother's Day gift), go for a more muted geometric design using pages from an Japanese puzzle magazine, gather up some vintage appeal by cutting into that newspaper-printed paper gift bag, or simply dig into the scrapbooking scraps for some playful color.

8. Keep your flowers uniform in shade...

or mix and match the colored blossoms in a paper botany experiment!

9. To make the headband, brooch, or barrette, thread one end of the ribbon through the flower, back to front, knot it, and then thread the end back through the flower, front to back. Thread multiples together this way, too! Wrap the ends of the ribbon around the headband, brooch, or barrette base and glue or knot to secure it.


And now, the million-dollar question for the author of Generation T: Can you make these flowers with T-shirts? Absolutely! Substitute fabric glue for the adhesive, and trim the neckline of a shirt with these sweet little blooms.

Visit us on Facebook!
Craft on!
Monday, April 23
Funky Fashion Goddess Frame
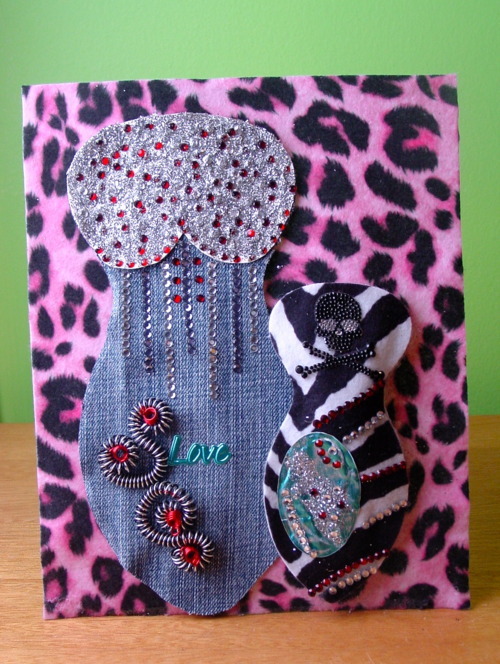

I absolutely love all of the color blocking and animal prints being used in todays fashion. From clothes to home decor you can find these two ideas in all of the trendy stores and magazines. I was so inspired that I thought I would include them in my Mothers Day project exclusively for ILOVETOCREATE readers. This Funky Fashion Goddess Frame is a take on creating with paper dolls. In this case I used my NEW Jewel Goddess dies from Spellbinders along with my most favorite ILOVETOCREATE products. This is a great Mommy and Me project for all Creative Souls!
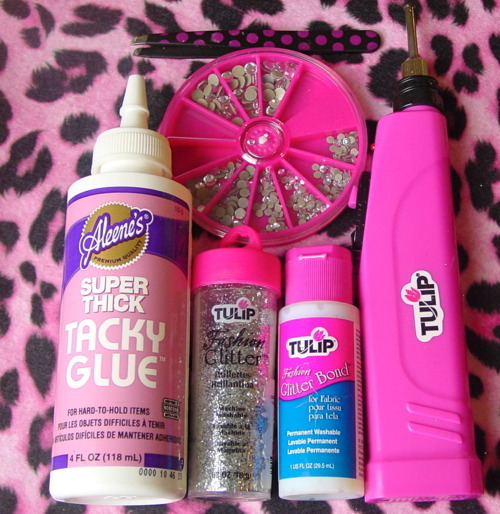
Supplies
Aleenes Super Thick Tacky Glue
Aleenes Hook and Loop Tacky Tape
Tulip Glitter Silver Fine Jewel 23550
Tulip Fashion Glitter Bond
Tulip Cordless Heat Setting Tool
Tulip Glam-It-Up! Fashion Art Tweezers ”SUPER LOVE” these!
Tulip Iron On Crystals 300 Clear Pack 23123 and Red 25621
Tulip Glam-It-Up! PDA: Personal Dazzle Assistance Clear Red Black 26637
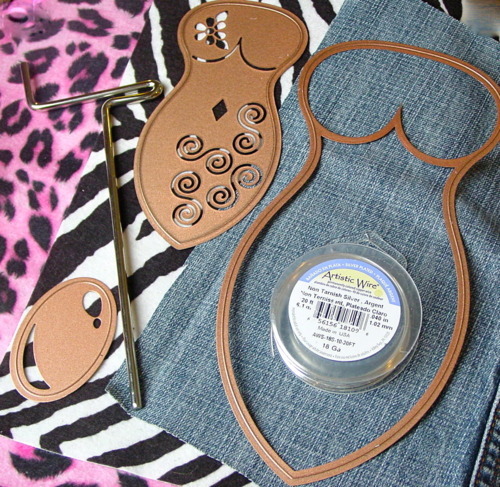
Zebra, Cheetah Felt, Craft Foil and Recycled Denim ( Repurpose: I used an old pair of denim jeans to cut my Goddess from)
Spellbinders Dies Jewel Goddess, Jewel Stones & Jewel Keys by Julianna Hudgins
Artistic Wire 18G Non Tarnish Silver, Black and Red
Beadalon Wire Cutters, Round Nose Pliers and Deluxe Coiling Gizmo
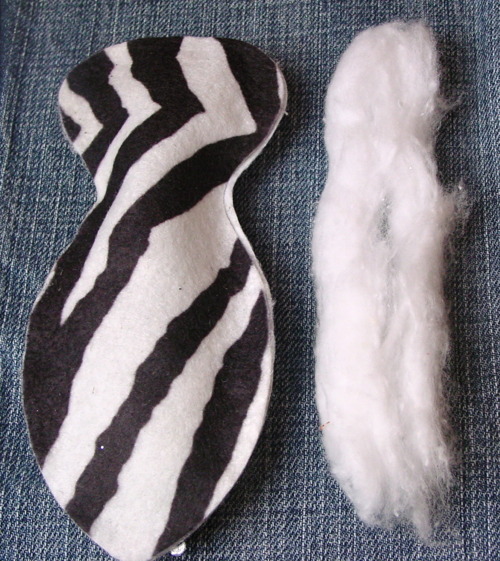
1. Using your Spellbinders Grand Caliber Die Cutting machine, cut out one Large Jewel Goddess from Denim, two small Jewel Goddess’s from Zebra felt, one round Jewel Stone and the word Love from the Jewel Keys out of craft foil. Note: Set one small goddess cut from zebra felt to the side.
2. Embellish all pieces using the Tulip Cordless Heat Setting Tool, Clear and Red Crystals, Silver Glitter and PDA crystal strips in Clear and Black.
3. For added dimension I repurposed the filler that comes in your vitamin jar (professional term, batting) to the back of my small goddess and then covered it with my second zebra cut goddess with Aleene’s Thick Tacky Glue.
4. Adhere Cheetah Felt to Acrylic frame using Aleene’s Thick Tacky Glue.
5. Adhere Aleene’s Hook and Loop to backs of large and small Jewel Goddess’s and attach to frame. This will allow you to switch out the Goddess’s for future “Funky Fashion” Paper Doll ideas!
6. To create the look of Tattooed Swirls I used my Deluxe Coiling Gizmo from Beadalon and Artistic Wire. Here’s a link from the Craft and Hobby Association Trade Show July 2011 courtesy of www.cool2craft.com on How to Create Funky Wire Beads.
7. Attach finished wire beads using Aleene’s Thick Tacky Glue.
Visit us on Facebook!
Craft on!
Friday, April 20
Creative Challenge! Cool2Craft TV
It's super cool! Cool2Craft TV April 23, 2012: Creative Challenge! We're celebrating creativity with a creative challenge this week! The Cool2Craft team was challenged to create projects which include: tissue paper, acrylic paint, stamps and beads. EcoHeidi Borchers is creating a Mixed Media Brown Bag Collaged Journal with Aleene's Collage Pauge and Tulip 3D Fashion Paints, Candace Jedrowicz is making Sparkle Bread Dough and Tissue Beads Necklace with Aleene's Turbo Tacky, Tiffany is crafting Stamped Thank You Notes and Floral Push Pins with Aleene's Tacky Glue and Savannah Starr is creating a Be-YOU-tiful Stay True Mirror with Aleene's Tacky Glue and Aleene's Collage Pauge.
It’s easy to watch the Cool2Craft TV Channel right from your computer. Airing Monday April 23, 2012 9am Pacific/10am Mountain/ 11 am Central/ Noon Eastern. Go to http://cool2craft.com and you'll see the Livestream player and chat box. See you Monday!
Visit us on Facebook!Craft on!Craft on!
Thursday, April 19
20 Green Crafts for Earth Day

Earth Day is this weekend and what better way to celebrate than with a green craft. This is my 3rd year in a row to do this series. Check out 2010 and 2011 too! Go out grab some fabric scraps, plastic bags, Coca-Cola crates and of course your salad spinner and let's get crafty.
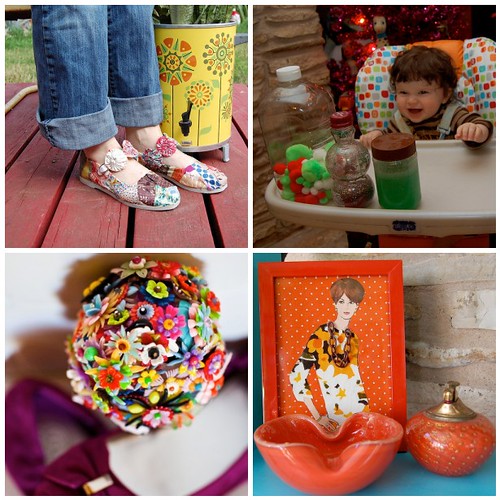
Collage Shoes - Revamp a pair of old shoes with a collage of fabric scraps.
Sensory Bottles - Save all your empty bottles to make some fun baby toys.
Bridesmaids Bouquet - Old plastic flower beads and vintage enamel flower brooches make for a lovely bouquet.
Fabric Frock Fanny - This fun collage project uses old chain, fabric and sewing patterns.
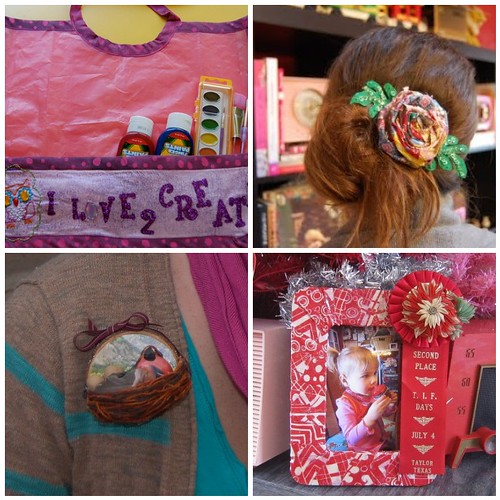
Plastic Bag Craft Smock - Plastic shopping bags keep your kids clothes clean!
Rolled Fabric Flowers - Use up your fabric scraps to make fun flower accessories.
Put a Bird On It Brooch - Have you seen Portlandia?
Second Place Picture Frame - An old shirt and second place prize ribbon transform a picture frame.
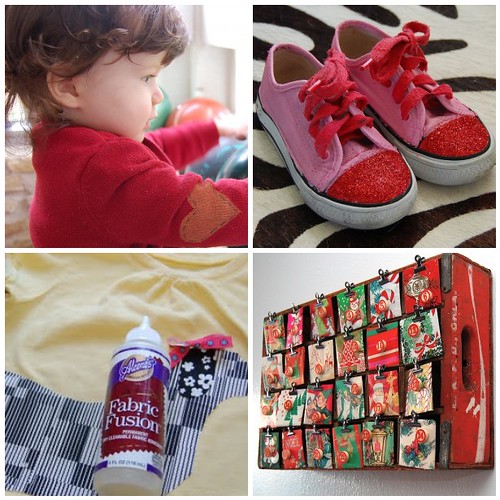
Elbow Patch Cardigan - Because everything is cuter with elbow patches.
New Chucks - Make an old pair of shoes new and fancy again with a coat of paint and some glitter.
Weenie Onesies - A thrift store onesie gets the one of a kind treatment with the help of some fabric scraps and Fabric Fusion Glue.
Coca-Cola Crate Advent Calendar - Vintage wrapping paper and an out of date coke crate are easily transformed into a festive advent calendar.

Scarf Necklace - Raid the thrift store for all the silk scarves and make yourself a unique necklace.
Thrift Store First Aid Kit - There are a few things every thrifter should have in their arsenal.
Jewelry Box - An old thrift store jewelry box is given a face lift with some Crafty Chica Paint, fabric and ric rac.
Robot Wrapping - Foil wrapped boxes make for some cute wrapping paper.

Salad Spinner Art - Who uses their salad spinner to spin salad? I use mine to craft.
Christmas Cutie - Make a stand-up paper doll with a vintage sewing pattern, Tacky Glue and scrapbooking goodies.
Make Your Own Coloring Book - Using scrap paper and some Tacky Glue you can easily make your own pad of paper or in this case coloring book.
Rubbing Plates - A set of discarded placemats and some glue make for some easy rubbing plates.
How are you going to celebrate Earth Day? Any fun up-cycling projects on your crafty horizon?
Visit us on Facebook!
Craft on!
Wednesday, April 18
MAYA IN THE MOMENT: Addison's Army T-Shirts
Addison's Army is a group that some classmates and I started in honor of baby Addison Cox, from my hometown of Phoenix, who was born with Stage 4 cancer that was passed on by her mother. Her case is so rare, it is even considered a medical mystery.
 |
| Baby Addison |
As a way to bring attention to her and plight (I'm donating to her cause as well), we attended one of her fundraisers and are making a video to share education about melanoma and about Addison's story.
We also put together a presentation to present at school and we wanted T-shirts to wear when we do that! Of course, I volunteered to make them! I think it is much more meaningful to hand make something for a cause and since we only needed a few shirts, I knew this was the way to go!
Supplies:
Tulip Fabric Spray
Tulip Fashion Form
craft
knife
T-shirt
Plastic table cover
Watercolor paper or cardstock
Pencil
Draw your letters on the cardstock and use the craft knife to cut them out. You can either use the cutout portion as a stencil, or use the letters alone. I went with the latter.
Before you actually spray on your shirt, test it on a sample fabric piece. Once you see that it works, line up your letters on the shirt and make sure they are flat and then spray.
It's important to spray on top of letters, as opposed to the side - that way the paint won't get under the letters.
We wanted a camo look, but with a girlie touch, so we used green and neon pink. Please send good wishes to baby Addison!
SIDE NOTE: Now that the sunny weather has arrived, protect your skin against melanoma! Melanoma is a form of skin cancer that becomes dangerous if not detected early. Here are some tips to remember:
- Minimize your exposure to ultraviolet rays, such as the sun or tanning beds.
- Always wear protective clothing when out in the sun. If you are on the beach, sure it's cool to wear your favorite bikini, but bring along a breezy cover up too.
- Bring along a floppy hat to protect your face (hey, how about this one?)
- Wear sunscreen, not only in your makeup, but on its own too!
- Stay out of direct sunlight between 11 a.m.and 3 p.m.
- Don't let yourself get sunburned!
Can you tell I'm passionate about this topic?
Thank and I hope you liked my project, please join me on Facebook!
Subscribe to:
Posts (Atom)


